Sunday, September 26, 2021

Young People in Old Bodies

Men my age are always buying shit we don't need, will never use, already have, or are too good of a deal to pass up. We are at a point in our lives (if things went halfway according to plan anyway) where we buy things because we can. I do the same thing. I spot things while I'm browsing the internet, or something will pop into my head while just walking around the house. Then I'll hit up the web and do some research, many times leading to a sale. I'm starting to change though--I will see something that looks like I can't live without it, and now I'll seriously consider it. That's because I'm starting to realize I don't have as many years left as my mind seems to think I do.

I think I'm still young.

Current (and usual) state of my workbench    
I still look at Craigslist ads all the time--looking for what I don't know, but I'll know it when I see it. I never know what my next fad or interest will be, and I'm pretty amazed at how easy it can happen. Here's a good example: My brother brought my old Honda ATC110 back after using it on his property for a few years. When I first sent it home with him I was single and didn't have much room in my rented duplex. Now I'm married, have a house with a shop, and a completely different outlook on things. In no time flat I've accumulated three complete ATC110's and an extra engine. There are parts all over hell in my shop. See what I mean? I have to keep telling myself, "stop looking at the fucking ads, man... you've got enough 3-wheeler shit!" The whole idea there was to get enough parts to make a nice one for Brenda to ride that's in as good of shape (read that 'complete') as mine is. It's really easy to get out of hand though.

I have come to realize the new predicament I'm in: I've got time I never had. Now that I'm retired I can afford to wander, dream, and over-analyze all I want. I have always had an overactive mind (which is both good and bad), but now I need to ask myself things like, "Do I still need that? Isn't it about time I looked into buying a good one? Do I have one of those?" I treat Craigslist ads as entertainment--something I wander in while I'm eating a bowl of cereal or something. I usually go on there and put an upper limit in the car search, like 1972, then sort from cheapest on up. There have been times when I've almost bought, then that little bastard goes *ping* on my shoulder and says, "No, you mustn't. You're old." I occasionally entertain the idea of buying another truck when I see the right deal, swapping whatever I wanted and reselling it. Luckily, the warning bells go off and stop me. The last thing I feel like doing these days is swapping major vehicle parts (unless they're busted). I just want to drive vehicles, not repair them.

As I said, retirement makes it worse. Now, I go to a store and amble around more than I used to because I have time. I might see something interesting and think, "I've always wanted one of those" or, "That's a hell of a deal, I should buy that multi-pack." If it's a tool or appliance I will usually buy, but I struggle the supply side of things. The packages with huge savings if you buy the package of multiple items. Recently, I bought a box full of great quality hacksaw blades at a garage sale. It was a super deal at five bucks, but when I got home I realized I have a shitload of hacksaw blades--more than I will ever use in my lifetime. I think it's because when I was young I never seemed to have a hacksaw blade around that was worth a shit.

Because I keep asking myself "What are the chances of you dying before you use this?" it annoys me when I see somebody with a t-shirt that stupidly boasts, "He who dies with the most toys wins." In my opinion, 'he who dies with the most toys has the biggest garage sale' of his beloved items, and for only pennies on the dollar.

We used to snicker at dad when he'd say something like, "My next bike's gonna be a Harley" when at that point in his life he barely even walk without a struggle. His mind was completely scattered at this point but it was still telling him he still a young man with lots of life left.

People are always getting hurt doing a seldom-practiced sport or some kind of task at home. It's not that we're attempting something we've never done--we've always done it. It's not like we think we're young (which would imply constant reassessment), we just assume so because our thinking has always been that way. Our minds still treat everything like we're still thirty years old. Yep, I get it now.

Sunday, September 12, 2021

Greenhouse Adventure: Conclusion

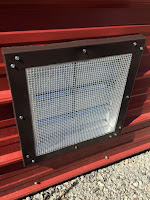
 Louvered Vent Openings

I pondered these things for quite a while, not knowing the best way to attack them. Thinking layers, I was pondering how all the things were going to work together. I had to figure out how to weatherstrip them, how to attach the screen, how to make the flashing work... things like that. Finally, I got down to business.

I ended up installing the louvers into the openings using the softer, black closure strips on the sides because they fit the metal roofing contour, and the firmer, white closure strip for the top section. I left the weatherstrip out for the lower section so any water would have a better chance of escaping. For the metal flashing I had to cut and trim each one to go around the metal roofing contour and depth. I installed them all using roofing/siding screws with the rubber washer removed.

I unrolled the screening I bought and measured out a couple of squares to fit over the louver openings. I had to trim them to fit around the protruding hex heads of the louver screws, then I painted them up with a little Krylon. Time to put everything together.


I had to do a fair amount of trimming to get the flashing pieces to nestle into the metal wall contour. They were all installed using self-drilling screws because of the thicker extrusion used on the louvers. I still have more flashing to put up, screw heads to touch-up, and caulking to do, but that will be the final items of business before declaring a done deal.


The Flashing Finish

The last thing there was to do was putting on flashing over a few of the edges and corners, and around the fan on the back wall. I was dreading it all because of it being such a slow, tedious job. Tucking foam closure strips under them as I went, pre-drilling all the holes, and making all the little cuts and bends as I went... probably not unlike a finish carpenter tying all the loose ends up in a new house. It feels like you're working an inch at a time. I did a little brake-forming on a piece of flashing and placed that over the door to keep water off the top of the door. (Fortunately, the door is facing away from our usual wind/rain direction, so it shouldn't be a problem anyway.) All the caulking and touch-up is complete, and what do you know--crops are almost ready for harvest!

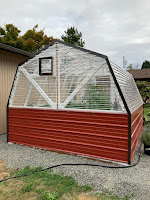
I didn't get any pictures of the final leg as I went, but here are a few of the finished product. Complete, and just in time for the Pacific Northwest rains!


Conclusion

Would I build this greenhouse again? Probably so. It's a great design--the fact that you can add to the length of it easily if you want to makes it easily customizable. It's also super easy to make it taller or shorter if you so desire. A few post-project notes about our greenhouse project:

  • COVID caused a lot of stock availability issues. There were several times I had a huge problem with finding everything I needed even though we are fortunate to live in an area that has 3 "pairs" of stores (Home Depot and Lowes) close to each other. Even so I was constantly hitting multiple stores on a single trip just to fill gaps. One week a store would have lots of flashing and no screws. The next week it might be no flashing and lots of screws. More than once I came home with nothing after hitting more than two stores. The whole 'chasing your tail' thing drove me nuts. Good thing I was not in a hurry. I started this thing in May and here it is the end of September. In all that time we had like only 2 or 3 rainy days (if you can call them that) so it's pretty obvious I was taking my time and enjoying myself. I am freshly-retired after all...
  • I did a lot of drilling/driving with my trusty DeWalt 20v drill--so much so that the chuck expired near the end of the project. Of course, I didn't buy a new drill--that's not my style. Instead, I ordered a new drill chuck (only $16) and worked on other things until it arrived.
  • People have asked, "Why didn't you turn the panels vertical so the water will run off easier?" Well, that's the common sense method, but installing the panels horizontally allows you to install the panels without any cutting or trimming. Of course, I had lots of cutting and trimming--had I not put the skylights in it would have been super easy. In my situation, adding the skylights made the directional choice a moot point anyway because of the amount of cutting and fitting I had to do to install roof clear panels around them. I probably could have turned the roofing panels without adding a whole lot more work than I already piled on myself.
  • The roof skylights I came up with are a life-saver. When you first open one of them in the morning you can feel a pretty good rush of air go out via the chimney effect. They were instrumental in everything surviving the summer heat we had this year!

Sunday, September 5, 2021

The Greenhouse Door Gets a Window

I'm sure glad I have an open schedule. If I were to be contracted to build this greenhouse I would have gone crazy. My OCD would kick in and send me screaming. As it is I enjoy the luxury (and I know it is) of being able to move at my own speed, taking the time to correct little things and make everything look nice.

Pretty much the whole time I was building the greenhouse I kept my eyes peeled for something cool we could use for the door window. I kept checking Craigslist, Offerup, and anywhere else I could think of, hoping for some item of stained glass. Everything I found was either too expensive, too big, broken, or any number of things. it was looking like the door window was going to be the last thing completed. Finally, something came along that looked perfect. We drove all the way up to Bellingham to plunk down $25 on this stained glass. The nice lady also threw in a smaller piece 'because it was cracked'.

After pondering how to best approach putting the new window in (I'm no carpenter, so I pondered it quite a while), I took the door off the greenhouse... again. The the door was built per the original Ana White plans, so the opening was quite a bit wider than it needed to be for this stained glass to fit into. It was actually a little short too. The opening measured about 1/4" short of being able to accommodate the stained glass piece. I didn't want to cut any additional material out of the door opening, so I opted to shift it slightly offset downward instead.

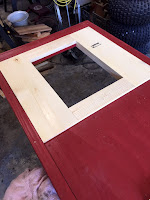
The first thing I did was cut two filler boards to put in the original window opening, bringing it down to the right width. (I chose the opening size with the intention that none of the stained glass frame would show after it was installed.) After mocking them up the pieces were glued and attached with pocket screws.


After giving it all a rough sand, I smooshed wood putty into any voids on the front side I could find. While all that crap was drying I turned the door over and spent some time cutting the four pieces that were going to be on the inside of the door, holding the glass in. I ended up getting them to fit nicely snug.

After I marked each of them to keep them in order, I took them back apart and started in with the step cuts that would be the recess. Because I was going to have the glass offset in the lower direction, the step cut for that particular was deeper than the others. In this picture you can see how I needed the lower portion of the design extends a bit. After the step cuts were all done I put them all together to check fit.

I decided it would be a good time to come up with some sort of frame to put around the window on the outside of the door. I ended up using some pieces that were ripped from a 2x4 I found in my scrap pile. I liked them because they had nice, rounded corners already. A couple minutes with the miter saw and viola (pronounced wah-lah).

 After giving everything a good sanding, I put red paint on the new wood on both sides, and when that was dry I painted white around the window opening.


After I painted the window frame pieces I attached them with brads.
 

Yep, here's the culprit that caused me so much rework: The new window:


When the paint was dry I mocked everything up again to make sure everything was going to fit correctly--this time with the window actually installed. This is why I like to do mockups first... I missed some paint. Turns out it was also a bit snug yet, so I had to take a tad bit more material off.

When you install windows, something needs to seal them and/or keep them from rattling. I wasn't sure what to embed the window with yet, but after looking around in stores I opted for this stuff. It comes "doubled" with the two strips attached to each other (peel apart) so it was easy to leave one of them intact so it would fit onto the one board that was deeper offset than the others. The other three sides were narrower and only used one bulb seal.

 
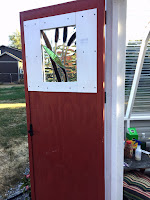
After carefully screwing everything together, I installed the door. There is still a little touch-up needed here and there, but wow, what in improvement!


As you can see, I also added more gravel (with landscape fabric underneath) so it was circling the greenhouse. It looks much better. I also plugged the two louver openings temporarily. The weather is getting cooler and I needed to close things up at night.