I'm sure glad I have an open schedule. If I were to be contracted to build this greenhouse I would have gone crazy. My OCD would kick in and send me screaming. As it is I enjoy the luxury (and I know it is) of being able to move at my own speed, taking the time to correct little things and make everything look nice.

After pondering how to best approach putting the new window in (I'm no carpenter, so I pondered it quite a while), I took the door off the greenhouse... again. The the door was built per the original Ana White plans, so the opening was quite a bit wider than it needed to be for this stained glass to fit into. It was actually a little short too. The opening measured about 1/4" short of being able to accommodate the stained glass piece. I didn't want to cut any additional material out of the door opening, so I opted to shift it slightly offset downward instead.
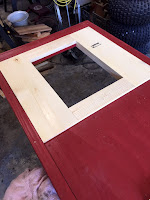
The first thing I did was cut two filler boards to put in the original window opening, bringing it down to the right width. (I chose the opening size with the intention that none of the stained glass frame would show after it was installed.) After mocking them up the pieces were glued and attached with pocket screws.
After giving it all a rough sand, I smooshed wood putty into any voids on the front side I could find. While all that crap was drying I turned the door over and spent some time cutting the four pieces that were going to be on the inside of the door, holding the glass in. I ended up getting them to fit nicely snug.
After I marked each of them to keep them in order, I took them back apart and started in with the step cuts that would be the recess. Because I was going to have the glass offset in the lower direction, the step cut for that particular was deeper than the others. In this picture you can see how I needed the lower portion of the design extends a bit. After the step cuts were all done I put them all together to check fit.
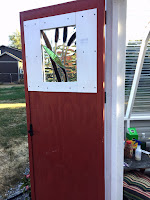
I decided it would be a good time to come up with some sort of frame to put around the window on the outside of the door. I ended up using some pieces that were ripped from a 2x4 I found in my scrap pile. I liked them because they had nice, rounded corners already. A couple minutes with the miter saw and viola (pronounced wah-lah).
After giving everything a good sanding, I put red paint on the new wood on both sides, and when that was dry I painted white around the window opening.
 When the paint was dry I mocked everything up again to make sure everything was going to fit correctly--this time with the window actually installed. This is why I like to do mockups first... I missed some paint. Turns out it was also a bit snug yet, so I had to take a tad bit more material off.
 When you install windows, something needs to seal them and/or keep them from rattling. I wasn't sure what to embed the window with yet, but after looking around in stores I opted for
this stuff. It comes "doubled" with the two strips attached to each other (peel
apart) so it was easy to leave one of them intact so it would fit onto the one
board that was deeper offset than the others. The other three sides were narrower and only used one bulb seal.
As you can see, I also added more gravel (with landscape fabric underneath) so it was circling the greenhouse. It looks much better. I also plugged the two louver openings temporarily. The weather is getting cooler and I needed to close things up at night.


No comments:
Post a Comment